 |
Does you child have a favorite cartoon character? Wouldn't it be nice if
you could put the company logo on the office party cake? Now you can. Transferring simple line drawings to cakes may seem
like a job for the professionals, but it's really one of the easiest projects possible for a beginner cake decorator. It's
true, you're friends will be ultra-impressed and only you have to know how simple it really was.
Once you learn this
technique, the possibilites are endless!
In addition to the regular cake decorating supplies -- pastry bags, decorating
tips, etc., you will need a sheet of rice paper. This edible "paper" is used for a pattern. Don't worry, the icing will naturally
dissolve the paper before you ever get around to eating the cake, but even if it didn't, it's edible (it's even Kosher). You
can find rice paper at cake decorating suppliers or hobby & craft stores.
So follow these simple steps and before
you know it, you'll be turning out professional looking cakes!
1. Use a non-toxic crayon (any Crayola will do) to
trace your design (from a coloring page or stencil) onto the rice paper. In order to get the most use from a single sheet
of paper, place you design as close to the edge as possible. Once you're finished tracing, carefully cut out the design as
close to the borders as possible. Save the remaining paper for another time.
2. Center the cut out rice paper pattern
on your frosted cake.
3. Fill a pastry bag, outfitted with a small round writing tip, with dark colored icing. This
is what you'll outline the design with. If you don't want to make your own icing (getting a dark enough color can be difficult),but
canned dark fudge icing works very well for outlining. Outline the entire design.
4. Now it's time to fill in the
design. Remember to start filling in with the smallest detailed areas first and the largest areas last. Use a small star tip
for filling and pipe lots of tiny stars until the entire area of your design is completed. Don't worry if some of your outline
seems to be getting lost, you're going to go over it again. To get instruction on how to pipe stars go to www.wilton.com and
click on their "Learn to Decorate" section.
Then go to "Basic Decorating Lessons", then click on "Basic Decorating Techniques",
then choose "stars". You can even watch a video clip of this technique.
5. After you've finished filling in, take
your outline bag and re-outline the entire design again. It amazing how this step will bring the design to life. Now it's
time to finish the cake. You might want to pipe a simple border or two. Another easy technique is to cover the sides of the
cake in multi-colored dots. Enjoy!
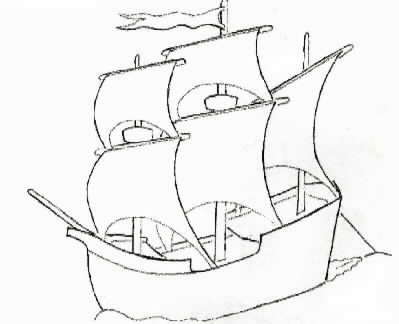
Here I took a coloring page of a ship, layed the rice paper over the top
and traced the outline onto the rice paper with a crayon. Now I can cut along the edge of the outline,center it on my frosted
cake and use dark frosting to go over the outline. Then I will pipe stars to fill in all the areas of the ship. White stars
on the sails, brown on the ship and etc.
|